Mastering Homemade Nando's Peri Peri Chicken: Your Ultimate BBQ & Oven Guide
Craving that iconic flame-grilled taste of Nando's Peri Peri chicken but don't want to break the bank or even leave your home? You're in the right place! Recreating your favourite spicy Portuguese chicken is not only achievable but also incredibly rewarding. This comprehensive guide will walk you through crafting a sensational homemade Nando's Peri Peri chicken recipe, perfect for both your BBQ and oven, complete with juicy corn cobs inspired by the restaurant experience. Get ready to unleash the fiery, tangy, and utterly delicious flavours of Portugal right in your own kitchen or backyard.
Making your own
Recreate Nando's Flavor: Spicy Portuguese Peri Peri with BBQ Corn chicken at home gives you complete control over the spice level, the quality of ingredients, and of course, saves you a significant amount compared to eating out. This isn't just a recipe; it's an experience that brings authentic Portuguese BBQ Peri Peri chicken straight to your table, proving that the best flavours are often found in homemade renditions.
The Secret to Authentic Peri Peri: Mastering the Marinade
The heart and soul of any great Peri Peri chicken lies in its marinade. This vibrant, flavour-packed sauce is what transforms ordinary chicken into an extraordinary culinary delight. Forget bland poultry; we're talking about a rich, spicy, and tangy concoction that permeates every fibre of the meat.
The Peri Peri Pepper Explained
Before diving into the recipe, let's appreciate the star ingredient: the Peri Peri pepper. Also known as the African Bird's Eye Chili, Peri Peri means "pepper-pepper" in Swahili. These small but mighty peppers are renowned for their intense heat and distinctive fruity flavour, which is fundamental to the signature Nando's taste. While getting fresh Peri Peri peppers might be a challenge for some, a good quality Sriracha or another red chili sauce can effectively mimic the desired heat and some of the flavour profile when combined with other ingredients.
Crafting Your Signature Sauce
Our homemade Nando's recipe draws inspiration from the classic, blending a mix of savory, sweet, and spicy notes. To create your perfect marinade, you'll need a base of BBQ sauce, fresh garlic for an aromatic punch, and your chosen chili component (like Sriracha) for that essential kick. The beauty of making it yourself is the ability to customize. Start by mixing your BBQ sauce and generous amounts of minced garlic. Then, gradually introduce your Sriracha or chili sauce, tasting as you go. Two to four teaspoons is a good starting point, but feel free to add more until you hit your ideal level of heat. If you prefer a milder version, you can simply omit the chili altogether. Remember, balance is key here – you want heat, but not at the expense of the other incredible flavours.
The Importance of Marination Time
Once your marinade is perfectly blended, it's time to introduce it to the chicken. For optimal flavour penetration, it's crucial to coat the chicken thoroughly. Don't be shy; get under the skin, especially around the breast meat, to ensure every bite is bursting with flavour. The longer you marinate, the deeper the taste. While a minimum of two hours is recommended for decent results, true connoisseurs will agree that an overnight marination in the refrigerator (or at least 8-12 hours) yields the most succulent and flavourful chicken. This extended soak allows the spices and acidity to tenderize the meat while infusing it with that unmistakable Peri Peri essence. This crucial step is what makes this
Easy & Cheaper Nando's Peri Peri Chicken: Master the Marinade truly shine.
Cooking Methods: Oven-Roasted Perfection vs. BBQ Char
Whether you prefer the controlled environment of your oven or the smoky allure of the grill, this homemade Nando's Peri Peri chicken recipe is versatile enough for both. Each method offers a unique texture and flavour profile, making it hard to pick a favourite!
Oven Method: Golden Skin, Juicy Interior
For those who lean towards a less hands-on approach, oven roasting delivers beautifully tender chicken with wonderfully crispy skin.
1.
Preparation is Key: Begin by setting your oven rack to the middle position and preheating to a searing 470°F (245°C). While the oven heats, remove your marinated chicken from the fridge and let it sit on the counter for about 20 minutes. This crucial step takes the chill off the meat, ensuring more even cooking. Avoid leaving it out longer than 30 minutes.
2.
Searing for Success: Heat 2 tablespoons of vegetable oil in an oven-proof pan or a well-seasoned cast-iron skillet over medium-high heat. Once the pan is hot, place the chicken, breast-side down, into the pan. Sear for 5-6 minutes until the skin achieves a rich, golden-brown colour. Flip and sear the other side for another 5 minutes. This searing creates an incredible crust and helps lock in moisture.
3.
Basting and Roasting: To the remaining unused marinade, add 2 more tablespoons of vegetable oil. Pour half of this mixture over the seared chicken, using a basting brush to ensure an even coat. Transfer the chicken to the preheated oven and roast for 20 minutes.
4.
Finishing Touches: Reduce the oven temperature to 400°F (200°C) and continue roasting for another 35-40 minutes, or until the chicken is cooked through and the juices run clear. An internal temperature of 165°F (74°C) is your target.
5.
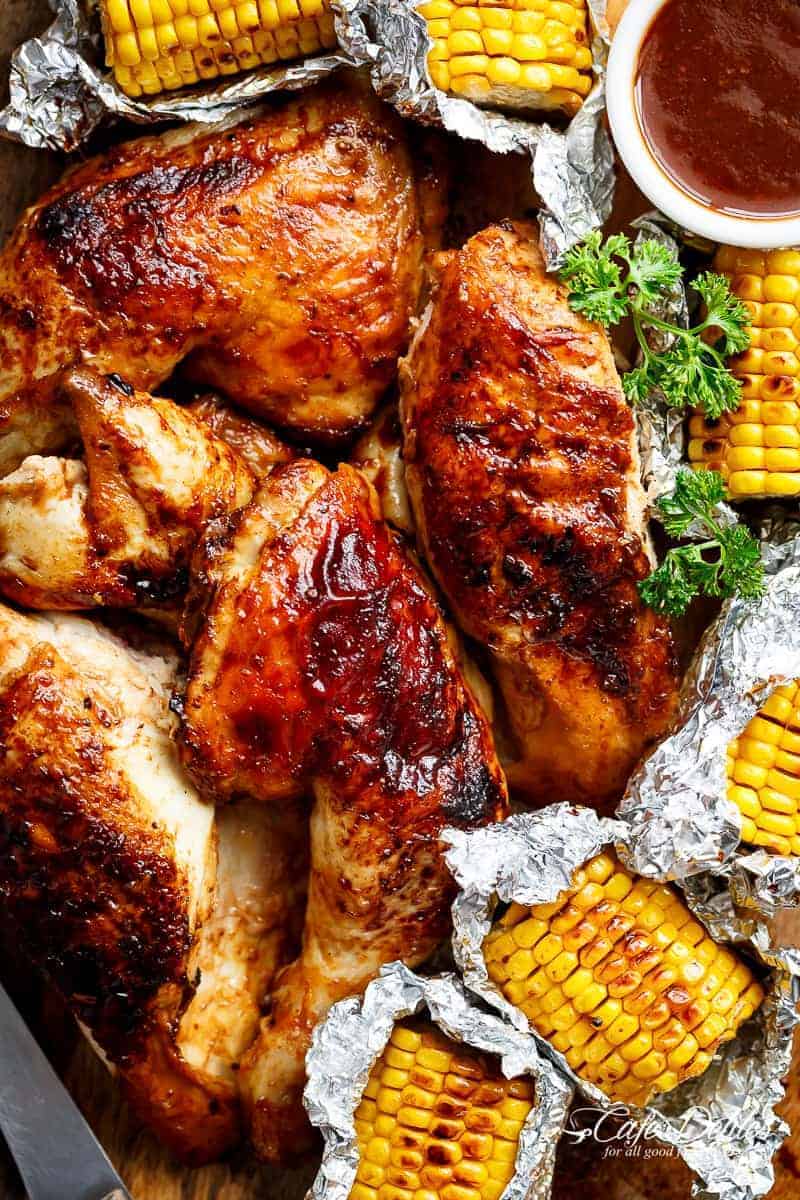
Adding Corn: If you're serving with corn, wrap each cob in foil packets. Add these packets to the same pan as the chicken halfway through the roasting time (after about 30 minutes of total chicken cooking time). They'll need approximately 30-35 minutes to cook. Once done, a dollop of butter on each cob is optional but highly recommended!
6.
Serve It Up: Once the chicken is done, baste it with the pan drippings for extra flavour. Serve immediately with any *untouched* remaining marinade as a dipping sauce, and your buttery corn cobs.
BBQ Method: Smoky Flavour, Perfect Char
For that authentic Portuguese BBQ Peri Peri chicken experience, grilling is the way to go. The smoky char and intense heat elevate the flavour profile to new heights.
1.
Grill Preparation: Ensure your grill is well-greased and preheated to a medium heat.
2.
Initial Char: Place the marinated chicken skin-side down on the grill. Cook for 10-12 minutes, allowing the skin to develop a beautiful char and golden hue.
3.
Basting and Grilling: While the chicken is cooking, add 2 tablespoons of vegetable oil to your remaining unused marinade. Flip the chicken and baste lightly with a small amount of the sauce. Be careful not to apply too much at once, as sugar in the marinade can cause flare-ups and burning on the grill plates. Close the barbecue lid and continue to cook for 40-45 minutes, flipping once or twice during this time to ensure even cooking and charring. The chicken is done when the juices run clear and an internal thermometer reads 165°F (74°C).
4.
Grilled Corn: As with the oven method, prepare your corn cobs in foil packets. Place them on the grill halfway through the chicken's cooking time (after approximately 30 minutes). Turn the corn packets every 5 minutes or so to ensure even cooking and a slight char.
5.
Enjoy: Once cooked, serve your smoky, charred Peri Peri chicken with the grilled corn and the untouched reserved marinade for dipping.
Elevating Your Peri Peri Experience: Tips & Sides
Making a great Peri Peri chicken is one thing; making it an unforgettable meal is another. Here are some extra tips and side dish suggestions to complete your homemade Nando's feast.
Expert Tips for Success
*
Choose Your Cut: While a whole spatchcocked chicken works wonders, feel free to use chicken thighs, drumsticks, or even breast fillets for quicker cooking times. Adjust cooking times accordingly.
*
Under the Skin Magic: Don't underestimate the power of getting that marinade under the skin. It ensures the breast meat, which can sometimes be drier, stays juicy and flavourful.
*
Resting is Best: After cooking, always let your chicken rest for 5-10 minutes before carving. This allows the juices to redistribute throughout the meat, resulting in a more tender and moist final product.
*
Dipping Perfection: That untouched reserved marinade isn't just for basting. It makes an incredible dipping sauce, providing an extra burst of flavour with every bite. Just ensure it hasn't come into contact with raw chicken.
Perfect Pairings
While the juicy corn cobs are a fantastic accompaniment, don't stop there! Consider these popular sides to round out your Peri Peri chicken experience:
*
Crispy Fries: A classic Nando's pairing, perfectly seasoned fries are always a hit.
*
Creamy Coleslaw: The cool, refreshing crunch of coleslaw provides a lovely contrast to the spicy chicken.
*
Portuguese Rice: A simple, flavourful rice dish can soak up all those delicious chicken juices.
*
Fresh Salad: A light green salad with a zesty vinaigrette offers a healthy and refreshing balance.
*
Garlic Bread: Perfect for mopping up any leftover sauce!
Embrace the joy of cooking and impress your family and friends with this incredible homemade Nando's Peri Peri chicken recipe. It’s a versatile dish that caters to different cooking preferences and spice tolerances, making it a guaranteed crowd-pleaser.
Bringing the vibrant flavours of Portuguese BBQ Peri Peri chicken to your home has never been easier or more delicious. This homemade Nando's recipe not only promises an explosion of taste but also the satisfaction of creating a restaurant-quality meal from scratch. Whether you opt for the tender, oven-roasted perfection or the smoky char of the grill, this Peri Peri chicken is sure to become a staple in your culinary repertoire. So fire up that oven or grill, get marinating, and prepare to savour every spicy, tangy, and utterly unforgettable bite!