Craving that iconic flame-grilled taste of Nando's Peri Peri Chicken but don't want to break the bank or leave the comfort of your home? You're in luck! Mastering your own portuguese bbq peri peri chicken homemade nandos recipe is not only incredibly satisfying but also surprisingly simple and significantly cheaper. Forget long queues and hefty restaurant bills; with this comprehensive guide, you'll learn how to create a succulent, spicy, and utterly delicious Peri Peri chicken that rivals your favorite takeaway, complete with juicy corn cobs on the side.
Why Master Your Own Peri Peri Chicken? Unlocking Flavor and Savings
The allure of Nando's is undeniable – the smoky char, the tender chicken, and that distinctive Peri Peri kick. But the true magic lies in the marinade, a vibrant blend of spices, herbs, and chili that transforms ordinary chicken into something extraordinary. By making it yourself, you gain complete control over the quality of ingredients, allowing you to choose fresh, wholesome components. This not only enhances the flavor profile but also ensures you know exactly what you're feeding your family.
Beyond ingredient control, the financial savings are substantial. A full Peri Peri chicken meal at home costs a fraction of what you'd pay at a restaurant. Plus, you can customize the spice level to perfection – from a gentle warmth to a fiery inferno – ensuring everyone at your table is happy. It’s an original, inspired culinary adventure that brings the beloved Nando's experience right to your kitchen or backyard BBQ, offering an unparalleled sense of accomplishment and a meal packed with authentic, robust flavors.
The Heart of the Flavor: Crafting Your Signature Marinade
The secret to an exceptional Peri Peri chicken lies almost entirely in its marinade. This isn't just a sauce; it's a flavor infusion. Our inspired marinade draws directly from the essence of classic Portuguese BBQ, focusing on layers of taste that penetrate deep into the chicken. Here's how to build it:
Essential Marinade Ingredients:
- BBQ Sauce: Provides a rich, smoky, and slightly sweet base that helps to caramelize beautifully during cooking. Choose a good quality, robust BBQ sauce.
- Fresh Garlic: Minced garlic is non-negotiable, offering an aromatic foundation that complements the heat.
- Sriracha (or other hot sauce): This is where the "Peri Peri" heat comes in. Sriracha delivers a vibrant, garlicky chili punch. Start with 2-4 teaspoons and gradually add more, tasting as you go, until you reach your desired level of spice. If you prefer a milder flavor, you can reduce the amount or omit it entirely.
- Other Aromatic Enhancers: While not explicitly stated in all Nando's copycat recipes, consider adding a splash of lemon juice for brightness, smoked paprika for depth, or a touch of dried oregano for an authentic Mediterranean touch.
The Art of Marination: Time is Your Ally
Once your marinade is perfectly mixed, it's time to introduce it to the chicken. For optimal flavor penetration and tenderness, coat your chicken thoroughly, ensuring the sauce gets not only on the outside but also under the skin, especially on the breast. This allows the flavors to truly infuse every fiber of the meat.
While a minimum of two hours will yield a tasty result, for a truly spectacular Homemade Nando's Peri Peri Chicken: Your Ultimate BBQ & Oven Guide, we highly recommend marinating overnight. The longer the chicken rests in this flavorful bath, the more profound and complex the taste will be, mirroring that restaurant-quality depth you crave.
Cooking Methods: From Oven Roast to Sizzling BBQ Perfection
Whether you prefer the controlled environment of your oven or the rustic charm of a barbecue, this portuguese bbq peri peri chicken homemade nandos recipe adapts beautifully. Regardless of your chosen method, always remove the chicken from the refrigerator about 20 minutes before cooking. This takes the chill out of the meat, allowing it to cook more evenly.
The Oven Method: Roasting to Golden Perfection
- Preheat & Prepare: Arrange an oven shelf to the middle position and preheat your oven to a blazing 470°F (245°C).
- Searing for Skin Perfection: In an oven-proof pan or well-seasoned skillet, heat 2 tablespoons of oil over medium heat until hot. Place the chicken, breast-side down, into the pan and sear for 5-6 minutes until the skin is beautifully golden brown and crispy. Flip and sear the other side for another 5 minutes. This crucial step locks in moisture and creates that desirable crispy skin.
- Basting and Roasting: Add 2 more tablespoons of vegetable oil to the remaining marinade (that hasn't touched the raw chicken) and pour about half of it over the seared chicken. Use a basting brush to coat evenly. Transfer the pan to the preheated oven and cook for 20 minutes.
- Reduce & Finish: Reduce the oven temperature to 400°F (200°C) and continue roasting for another 35-40 minutes, or until the chicken is cooked through and the juices run clear. An internal temperature of 165°F (74°C) in the thickest part of the thigh (avoiding bone) ensures doneness.
The BBQ Method: Charred and Smoky Excellence
- Grill Setup: Ensure your grill is well-greased and preheated to medium heat.
- Initial Char: Place the chicken skin-side down on the grill. Cook for 10-12 minutes until the skin develops a lovely char and grill marks.
- Basting & Grilling: Add 2 more tablespoons of vegetable oil to the remaining (untouched) marinade. Flip the chicken and baste with a small amount of sauce – be careful not to overdo it, as excessive marinade can burn on the grill plates. Close the barbecue lid and cook for 40-45 minutes, flipping once or twice, until the chicken is completely cooked through and the juices run clear. Again, an internal temperature of 165°F (74°C) is your target.
Once your chicken is cooked to perfection, whether in the oven or on the grill, allow it to rest for 5-10 minutes before serving. This allows the juices to redistribute, resulting in a more tender and flavorful bird. Remember to baste with any pan drippings or serve with the remaining untouched marinade as a zesty dipping sauce.
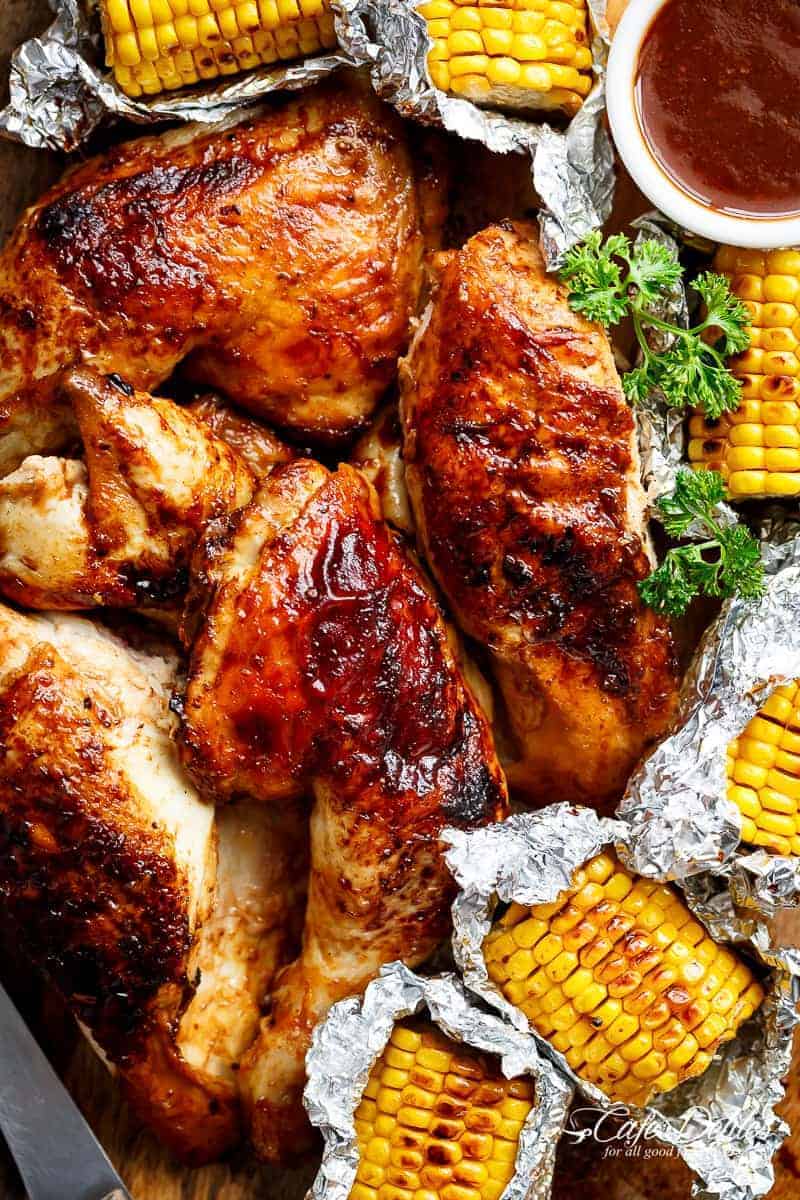
The Perfect Accompaniment: Juicy Corn Cobs
No homemade Nando's feast is complete without the sweet, tender crunch of corn on the cob. This simple addition elevates the meal and complements the spicy chicken beautifully.
- Foil Packets: Completely wrap each corn cob in a piece of aluminum foil large enough to cover it entirely.
- Cooking Time:
- Oven: Add the corn foil packets to the same pan as the chicken halfway through its cooking time (after about 30 minutes). If your pan is too small, use a separate baking sheet. The corn needs about 30-35 minutes to cook.
- BBQ: Place the corn foil packets on the grill halfway through the chicken's cooking time (after about 30 minutes). Turn the corn every 5 minutes or so to ensure even cooking and a slight char.
- Optional Finish: Once the corn is done, unwrap and dollop with about 1/2 teaspoon of butter per cob for an extra touch of richness.
For more on perfecting this delightful side dish and other ways to recreate the full Nando's experience, check out our guide on Recreate Nando's Flavor: Spicy Portuguese Peri Peri with BBQ Corn.
Elevate Your Homemade Nando's Experience
Taking your portuguese bbq peri peri chicken homemade nandos recipe from good to unforgettable involves a few extra touches. Consider the following to truly make it your own:
- Chicken Cuts: While a whole spatchcocked chicken works wonderfully, feel free to use bone-in thighs, drumsticks, or even breasts. Adjust cooking times accordingly, but always prioritize marination for maximum flavor.
- Garnish and Serve: A sprinkle of fresh chopped parsley or cilantro adds a pop of color and freshness. Serve with fresh lemon wedges for an extra burst of citrus.
- Side Dish Harmony: Beyond corn, consider serving with a simple green salad, fluffy rice, crispy homemade fries, or even a vibrant coleslaw to balance the heat.
- Beverage Pairings: A crisp lager, a refreshing sparkling water with lime, or even a dry rosé can complement the spicy flavors beautifully.
- Leftovers (if any!): Shred any leftover Peri Peri chicken for wraps, sandwiches, or even a spicy chicken salad the next day. The flavors only deepen with time.
Don't be afraid to experiment with your marinade – a touch of ginger, a different type of chili, or even a hint of red wine vinegar can all add unique twists while staying true to the spirit of Portuguese BBQ. The beauty of a homemade recipe is the freedom to tailor it to your exact preferences.
Conclusion
Creating your own portuguese bbq peri peri chicken homemade nandos recipe is a culinary adventure that promises big flavors, significant savings, and immense satisfaction. From the moment you whisk together the vibrant marinade to the first bite of tender, spicy chicken, you'll appreciate the effort. This recipe empowers you to bring the beloved taste of Nando's to your table, customized to your palate and perfected by your own hands. So fire up the grill or preheat your oven, and prepare to impress your taste buds with a homemade Peri Peri chicken experience that’s truly unmatched.
